Penalties
Manage fleet-specific penalties in fleet master, including how to add, split into installments, track violations directly assigned to fleets, and process advance payments.
Viewing and Managing Penalties
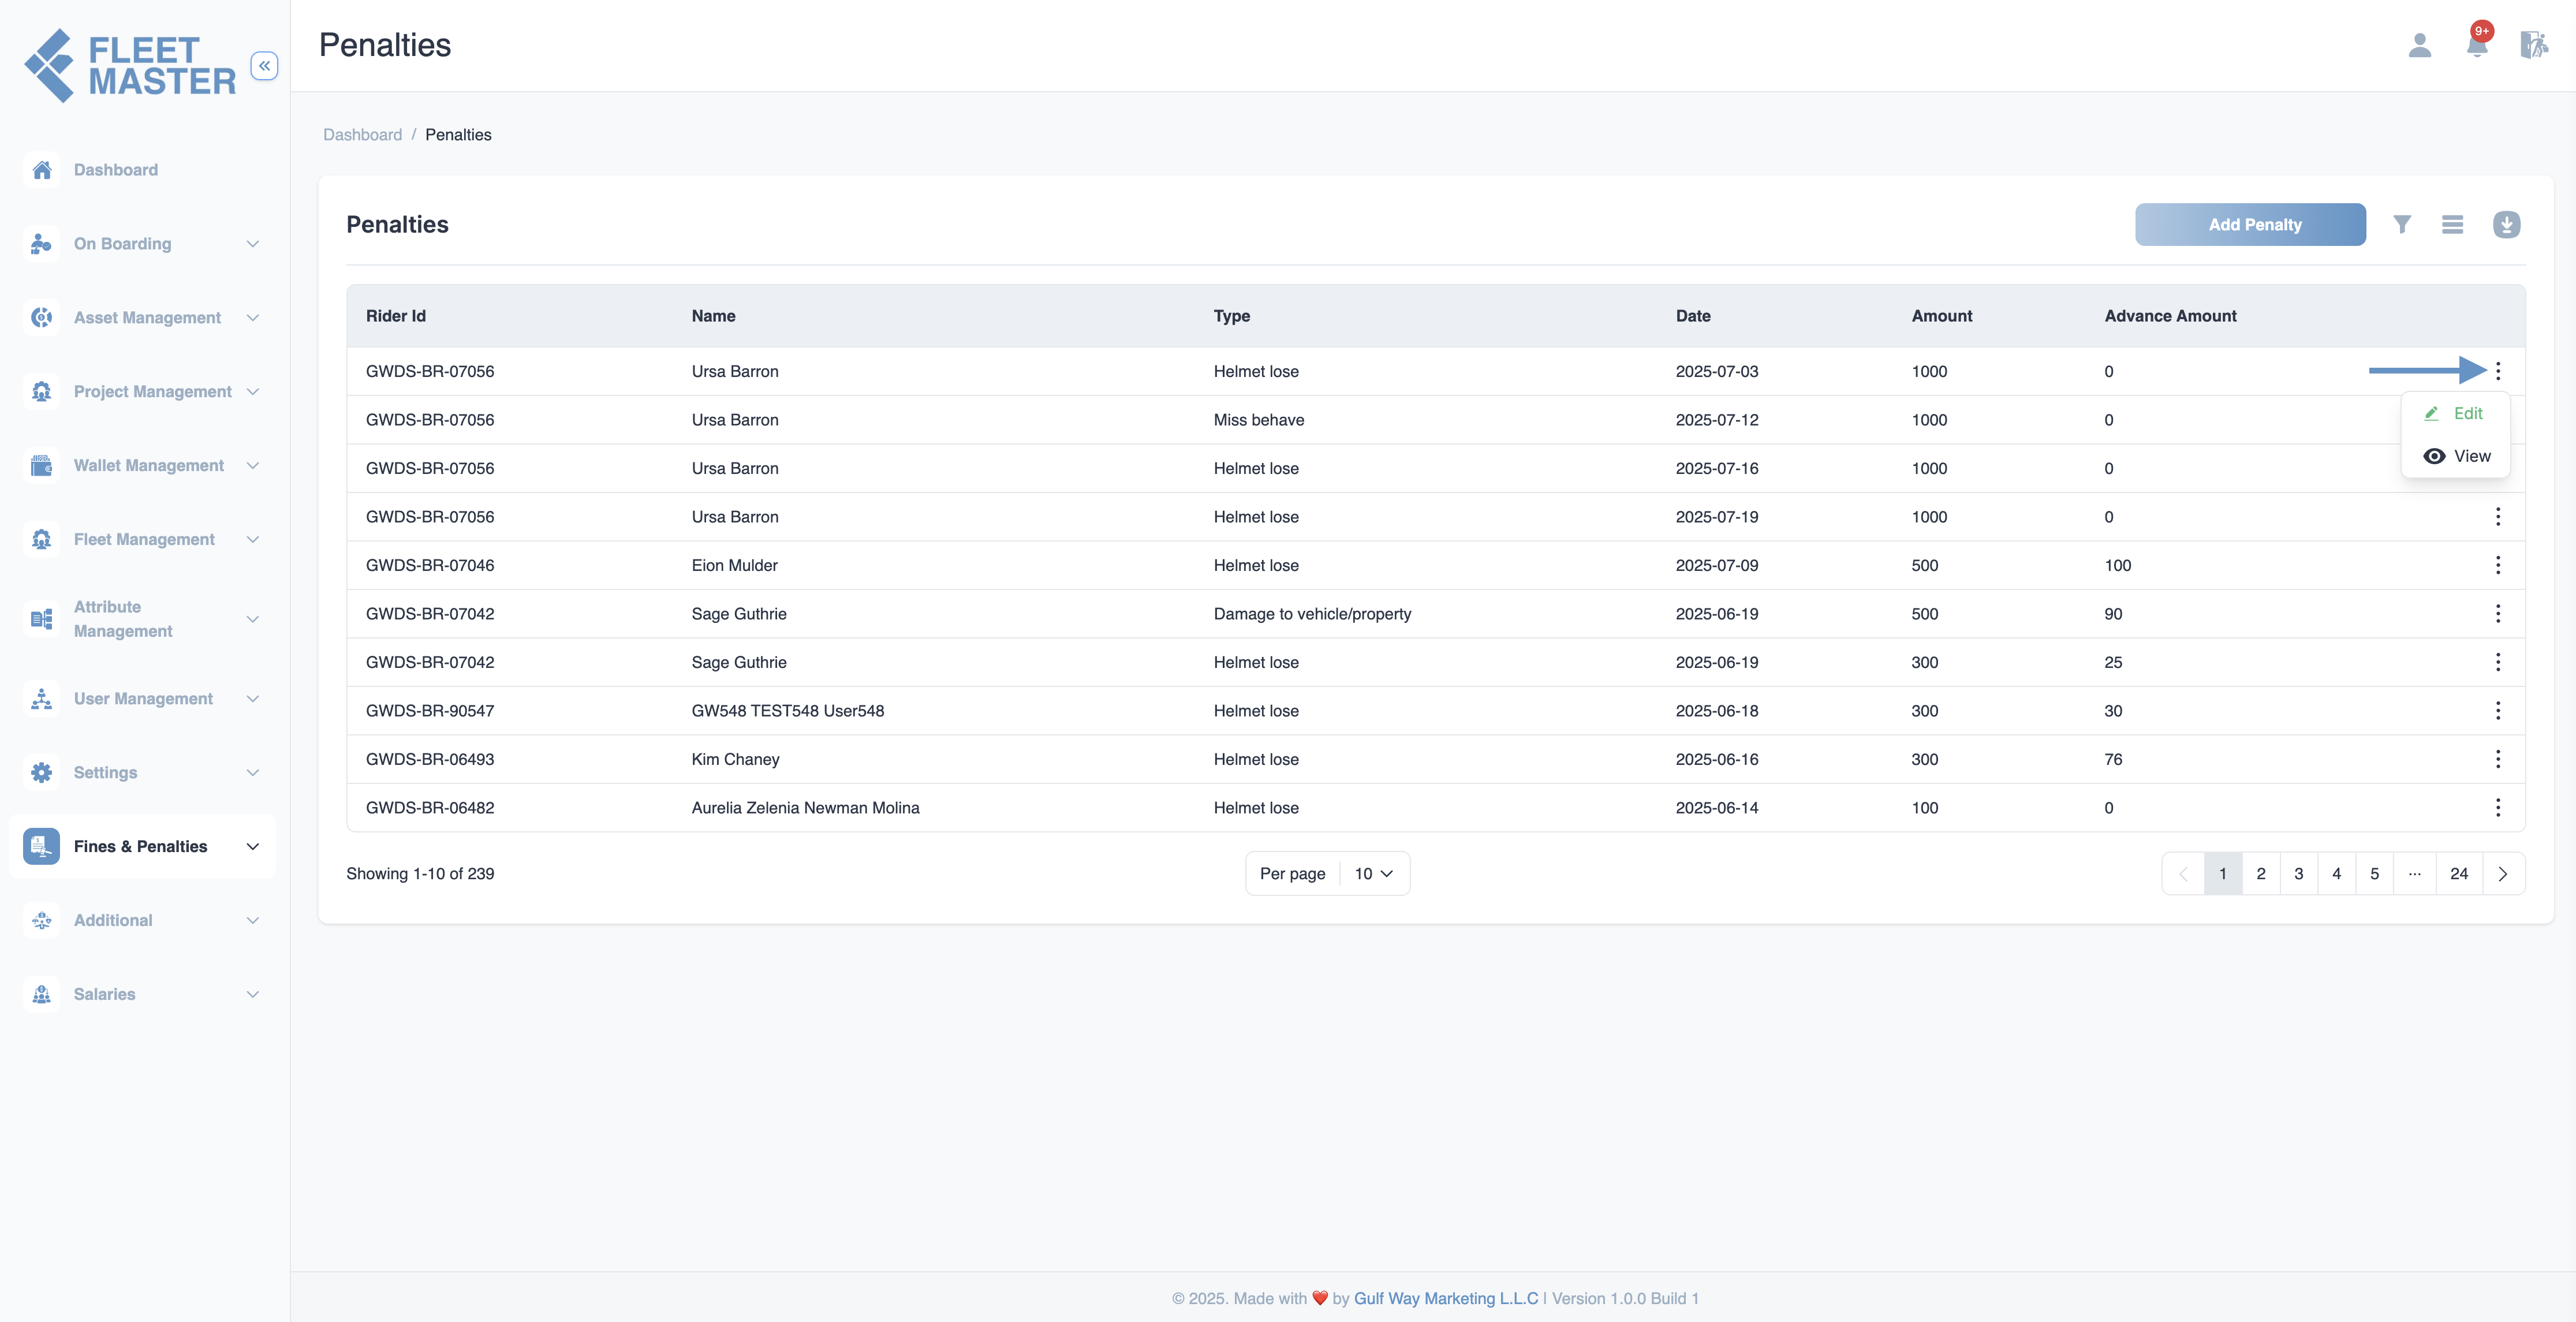
- Navigate to the Fines & Penalties section in the sidebar and click on Penalties.
- You'll see a table listing all penalties with key details:
- Fleet ID and Name
- Type (violation type assigned to the fleet)
- Date, Amount
- Advance Amount, if any
- Use the search functionality to filter penalties or click Add Penalty to create a new one.
Adding a Penalty
When adding a penalty:
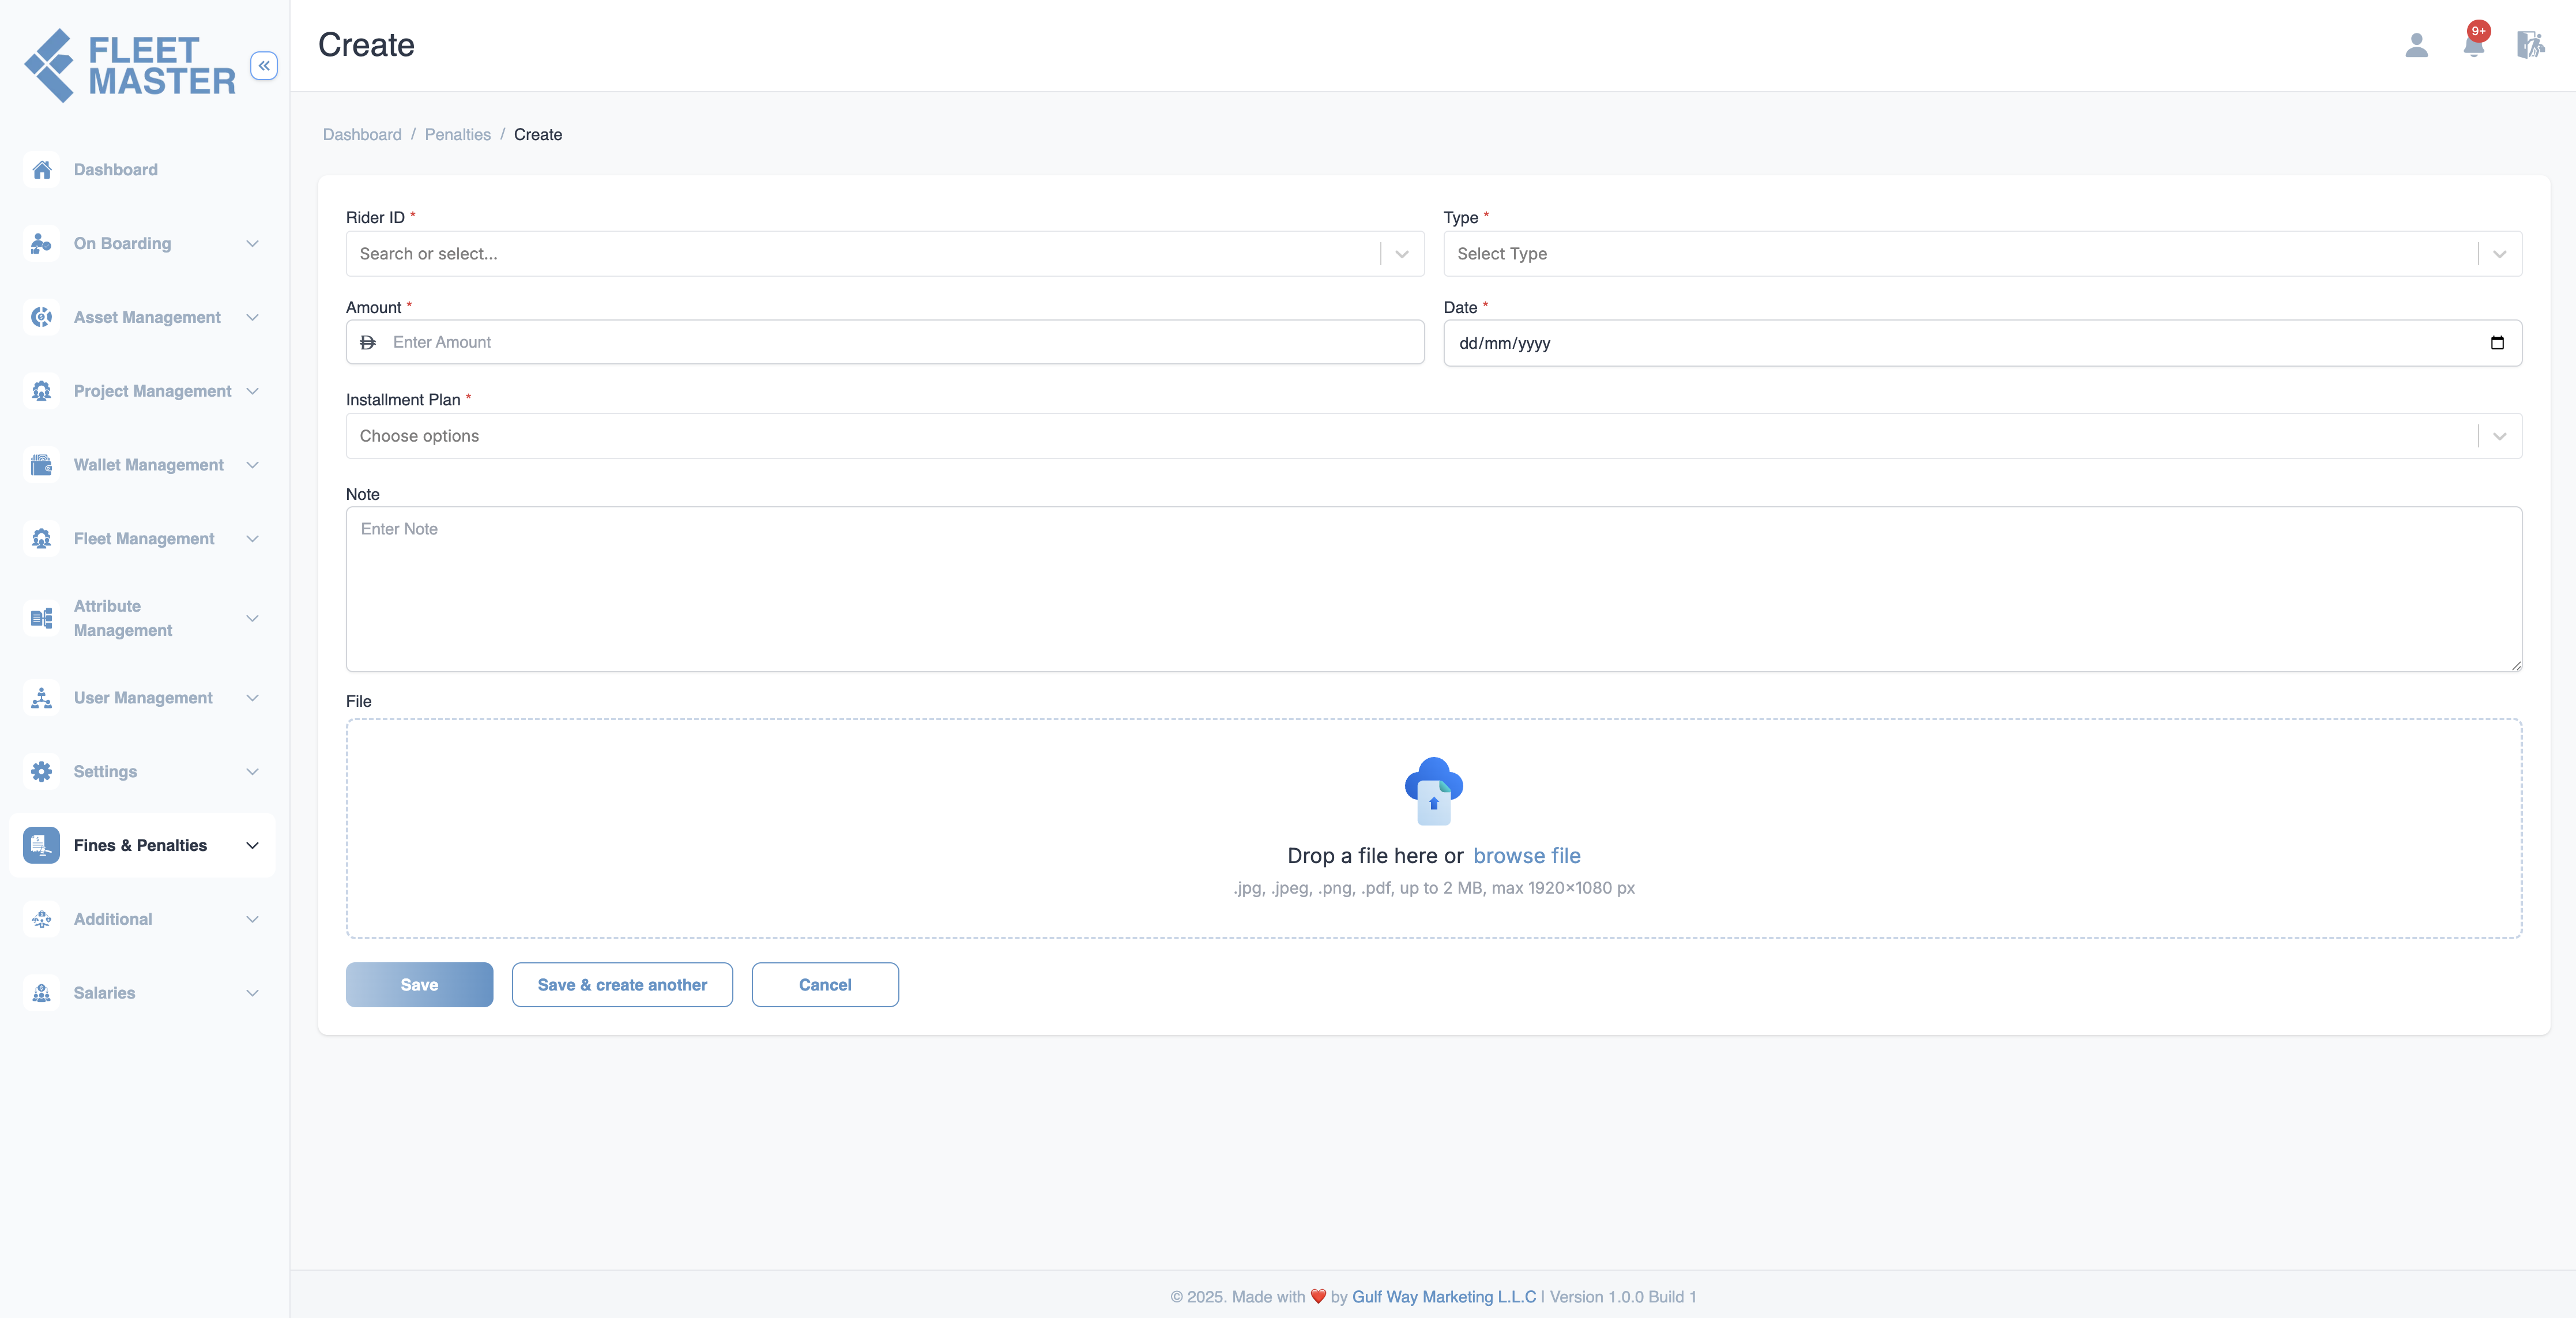
- Click Add Penalty.
- Fill out the following fields:
- Fleet ID: Search and select the specific fleet to assign the penalty to.
- Type: Select the violation type from available options.
- Amount: Enter the total penalty amount.
- Date: Penalty issue date.
- Installment Plan: Choose how the amount should be paid.
- Note: Optional remarks about the penalty.
- File Upload: Attach any relevant documents (.jpg, .jpeg, .png, .pdf; max 2 MB, max 1920x1080 px).
Key Difference:
Unlike fines which are linked to Asset IDs, penalties are directly assigned to Fleet IDs. This allows for personal violations or infractions that aren't necessarily vehicle-related.
- Click Save, Save & create another, or Cancel to complete the action.
Installment Plans for Penalties
Penalties can be split into installments just like fines:
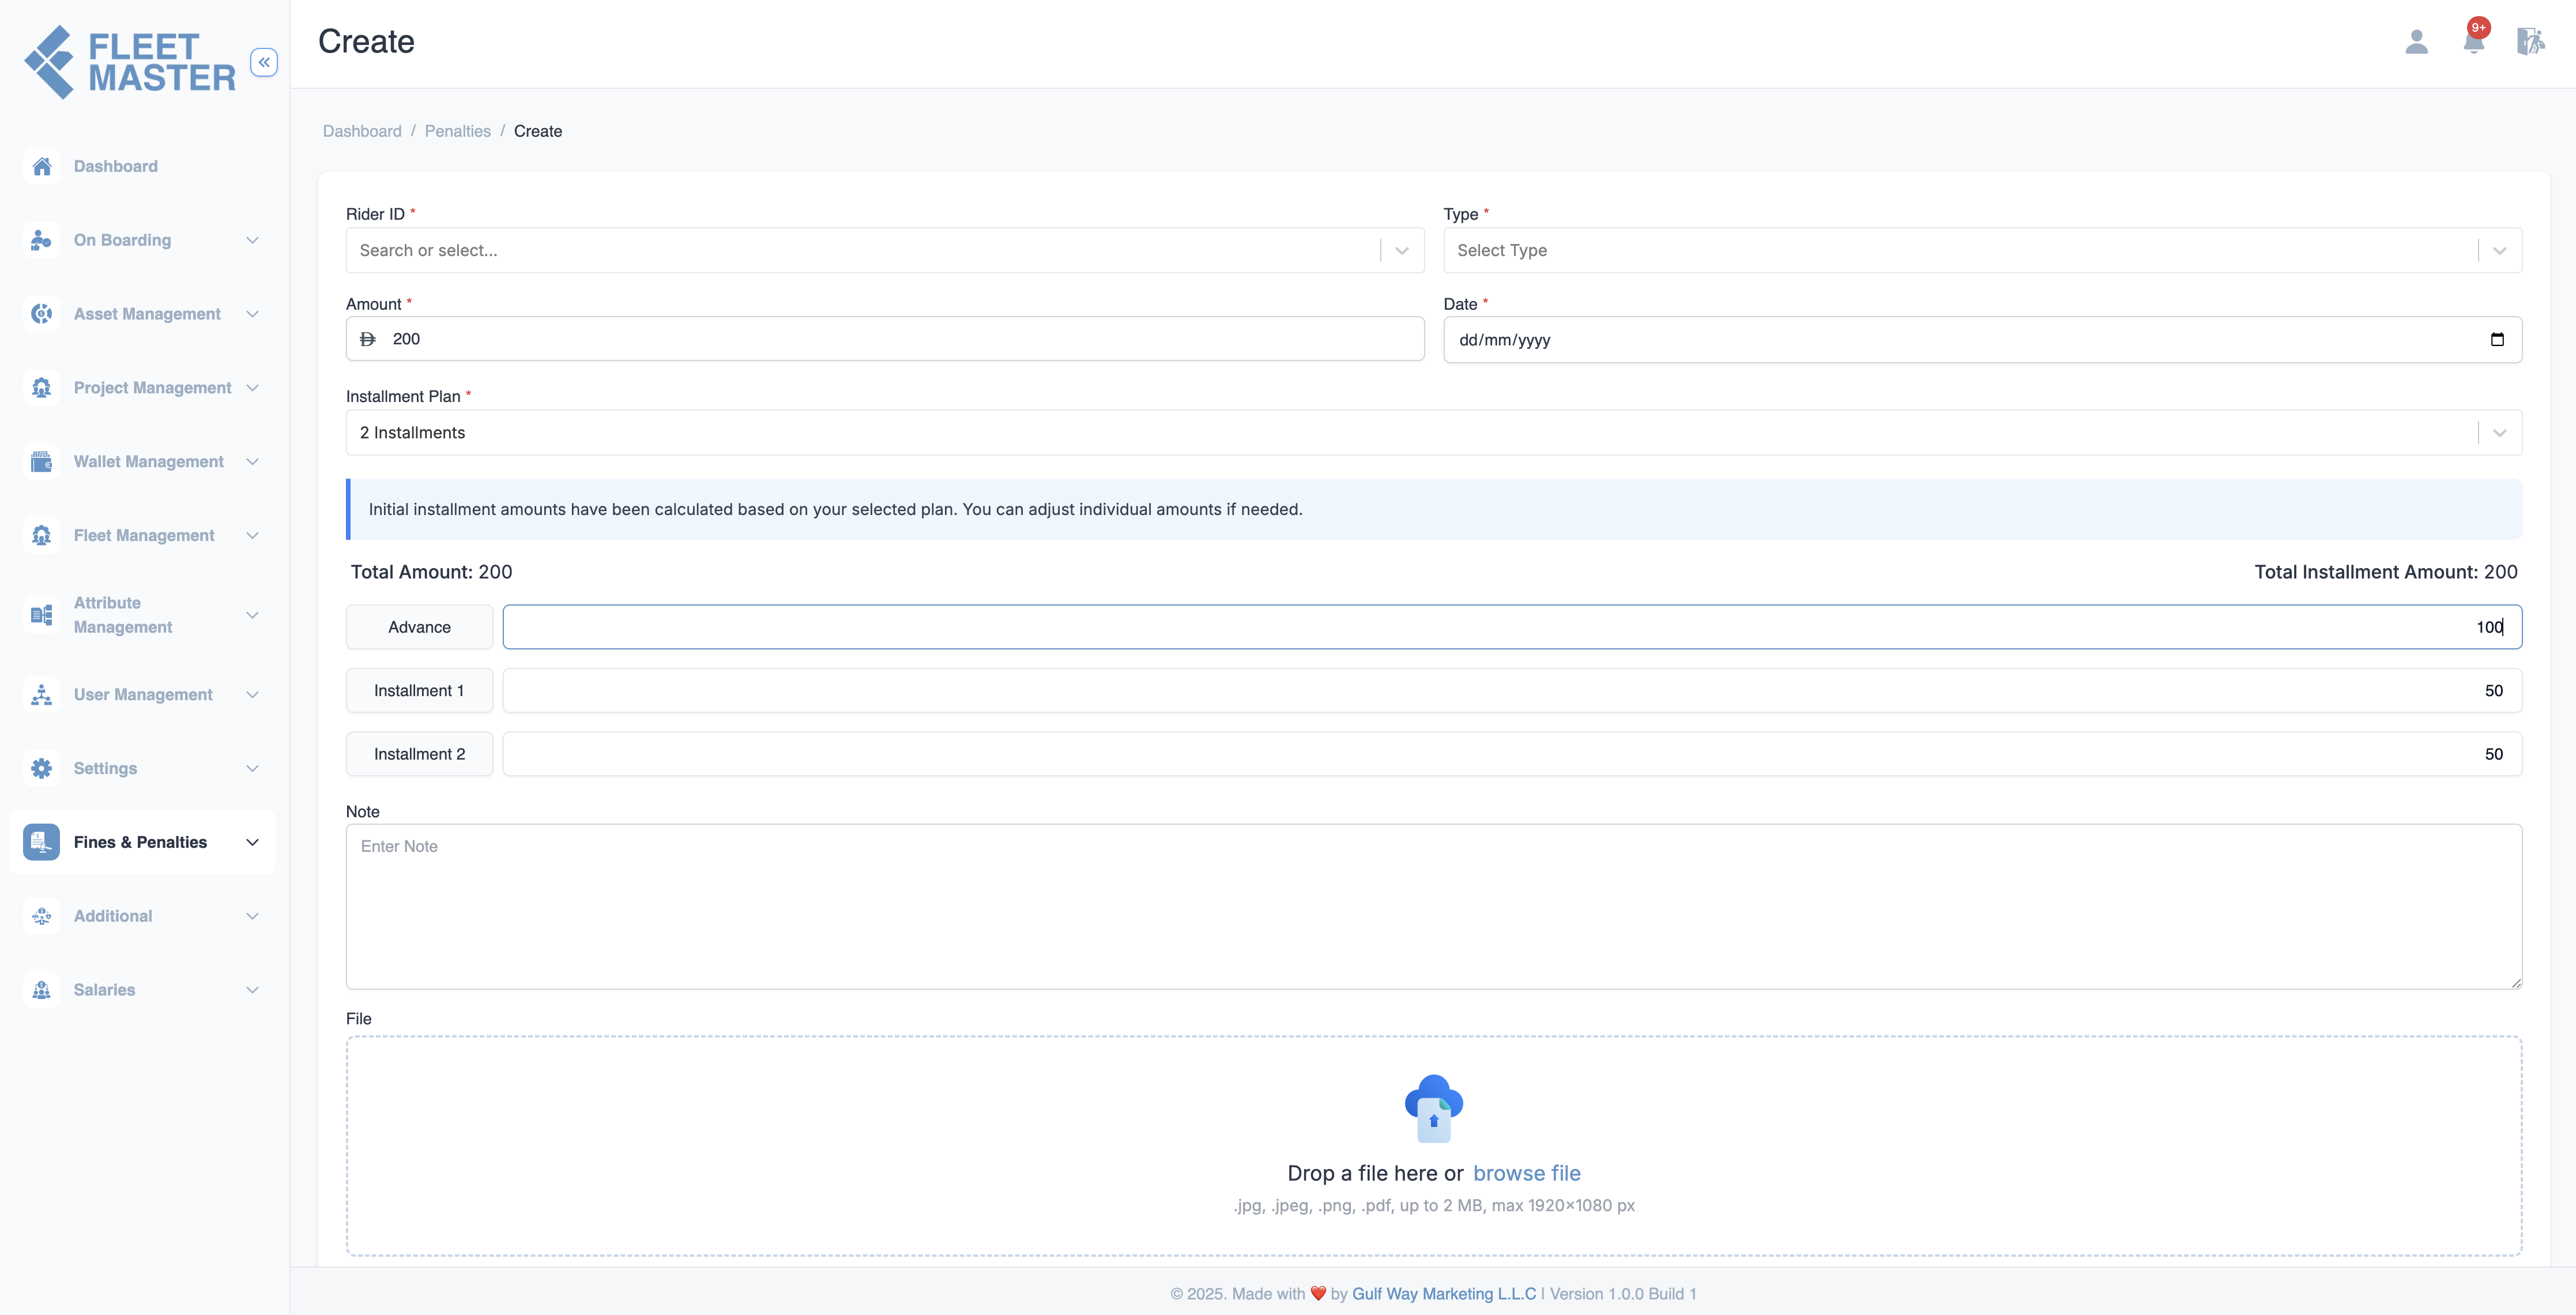
- Enter the total Amount.
- Select an Installment Plan (e.g., 3 Installments).
- The system auto-splits the penalty into equal parts.
- Advance is set to
0by default.- If you enter an advance, the rest is evenly split.
Example:
Amount: 500
Installments: 3
Advance: 100
| Payment Type | Amount |
|---|---|
| Advance | 100 |
| Installment 1 | 134 |
| Installment 2 | 133 |
| Installment 3 | 133 |
Payment Methods for Penalty Installments
There are two ways to pay penalty installments:
1. Automatic Salary Deduction (Default)
By default, installment amounts are automatically deducted from the fleet's salary according to the payment schedule.
2. Manual Payment via "Pay Now" Button
If a fleet wants to pay a penalty installment immediately without waiting for salary deduction:
How Manual Payment Works:
-
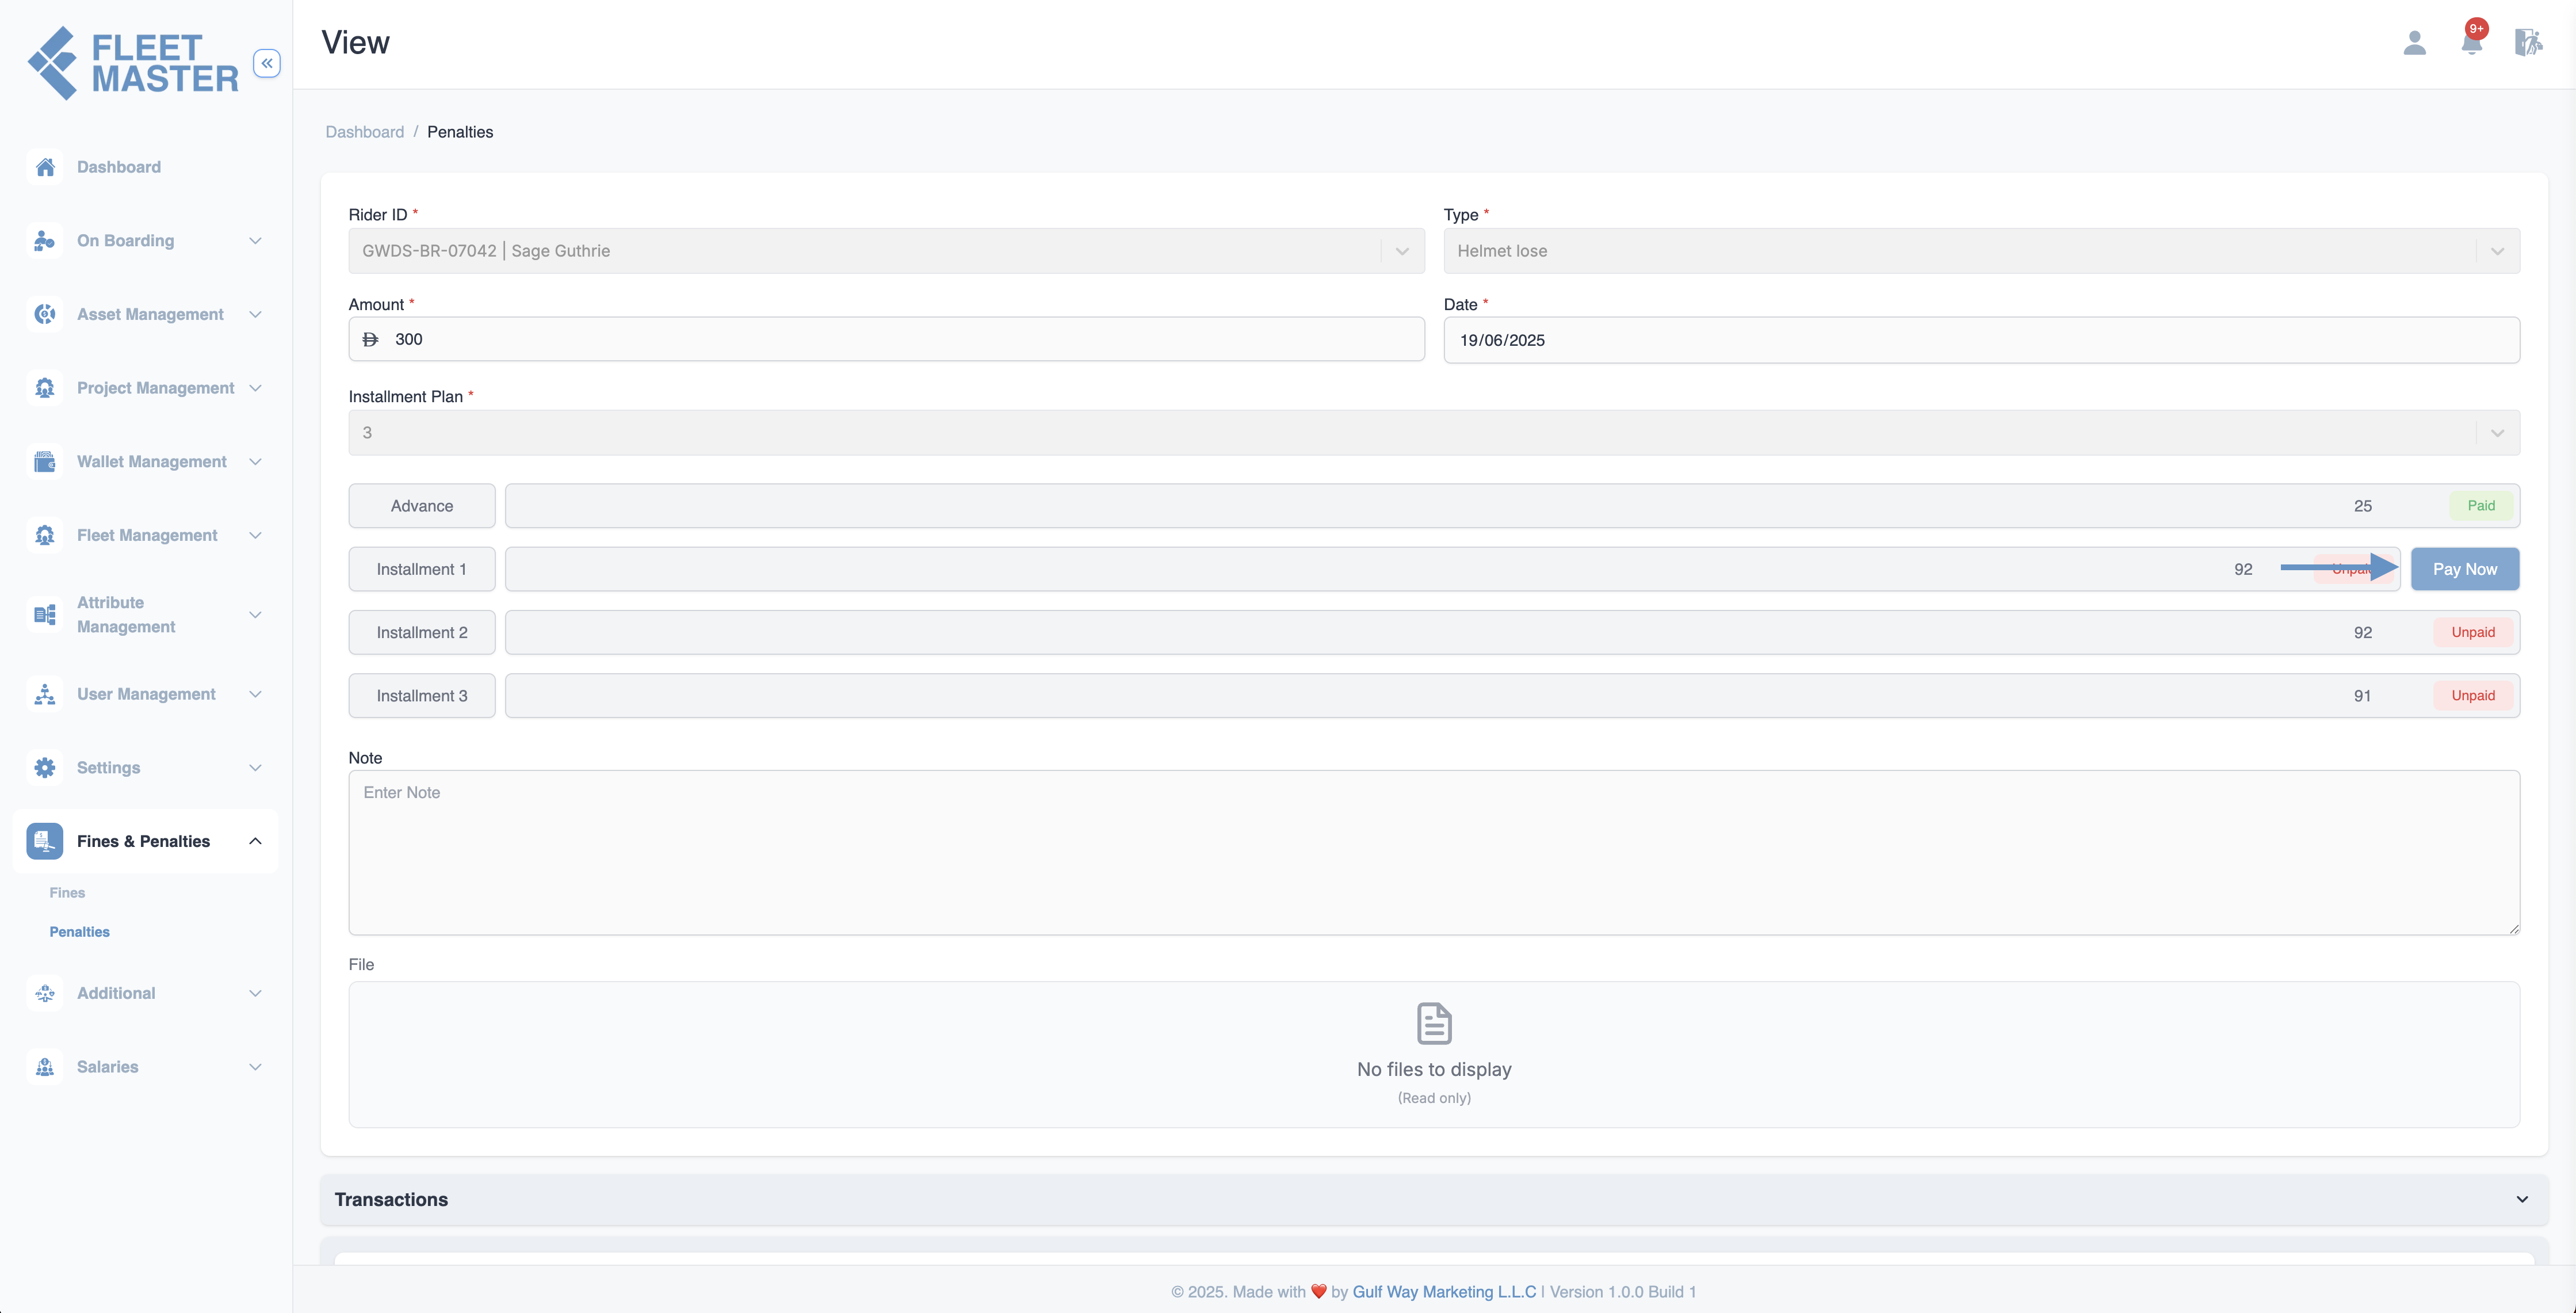
Navigate to Penalty View: Go to the penalty's View page where you can see all installment details.
-
Sequential Payment: The Pay Now button appears on the right side of the first unpaid installment only.
- You cannot skip installments - they must be paid in order (1st → 2nd → 3rd, etc.)
-
Payment Process:
- Click the Pay Now button next to the current installment
- A "Make Payment" modal will popup
- Fill in the payment details:
- Mode of Payment: Select payment method (Cash, Bank Transfer, etc.)
- Amount: Pre-filled with the installment amount
- Note: Optional payment remarks
- Click Save to submit the payment
-
Payment Confirmation:
- The payment goes to "In Review" status in the Transactions section
- An admin must confirm or reject the transaction
- Once confirmed, the installment shows as "Paid"
-
Next Installment: After confirmation, the Pay Now button automatically appears on the next unpaid installment.
Payment Flow Example:
Initial State:
- Installment 1: Shows Pay Now button
- Installment 2: No button (locked)
- Installment 3: No button (locked)
After paying Installment 1:
- Installment 1: Shows "Paid" status
- Installment 2: Shows Pay Now button
- Installment 3: No button (still locked)
After paying Installment 2:
- Installment 1: "Paid"
- Installment 2: "Paid"
- Installment 3: Shows Pay Now button
Processing Penalty Advance Payments
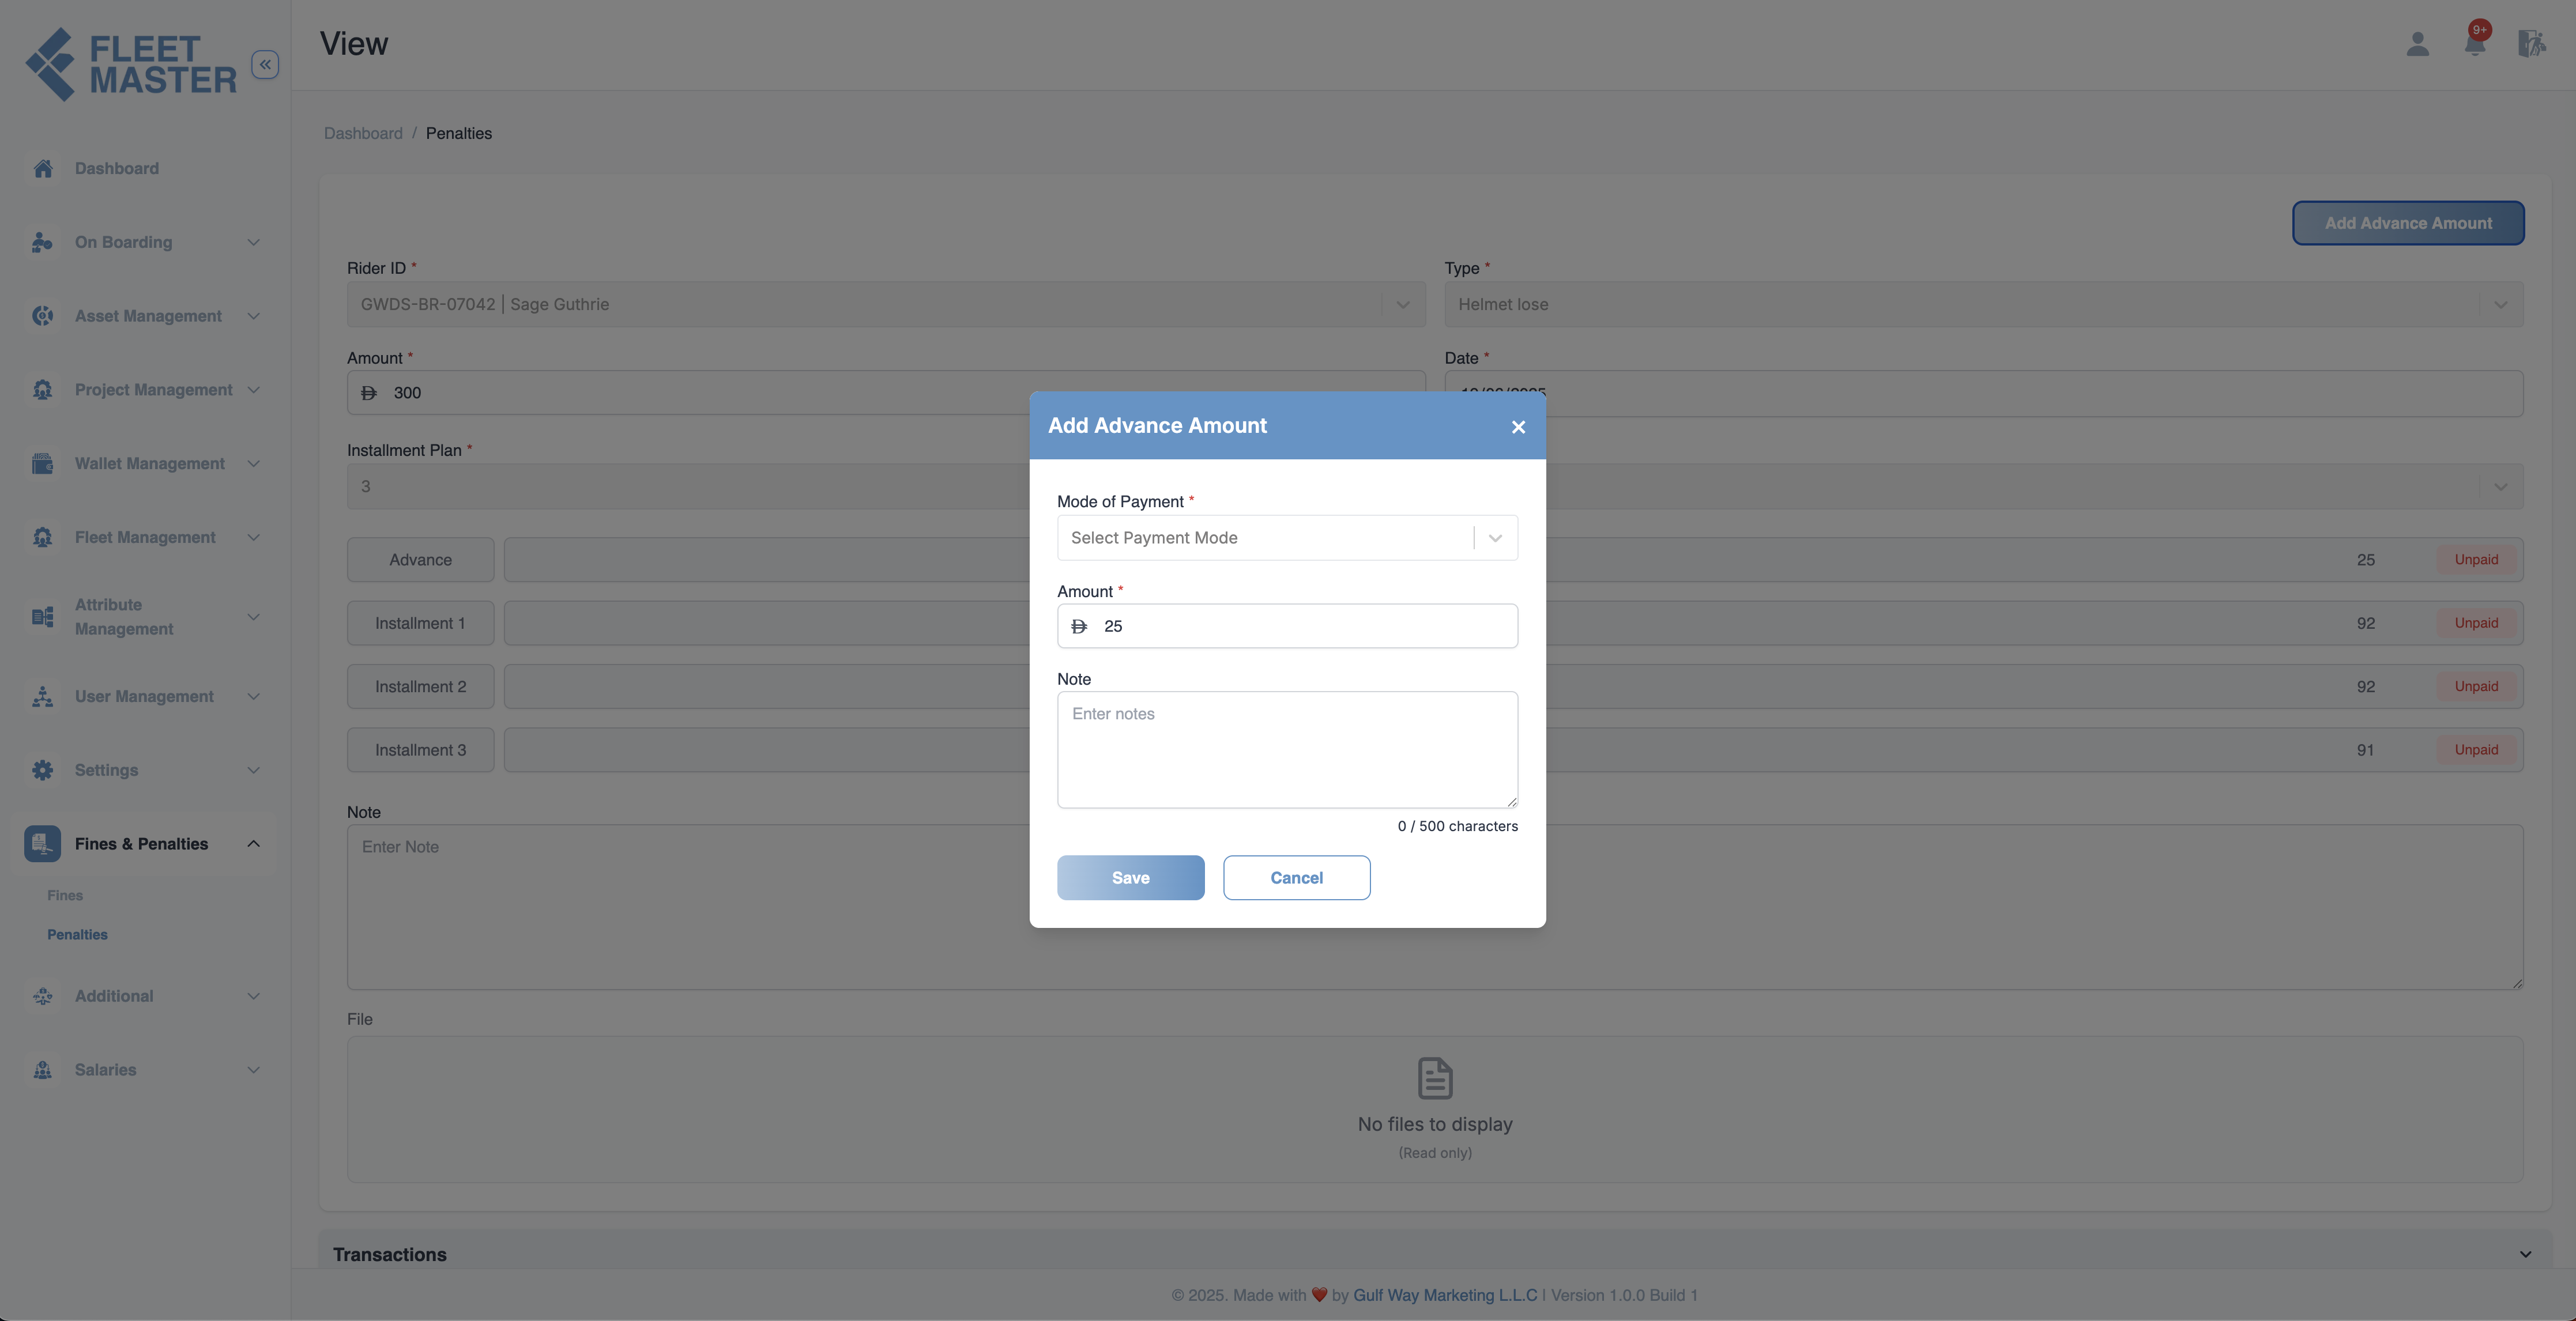
When viewing a penalty with an unpaid advance amount:
Adding Advance Payment
- Navigate to the penalty's View page.
- If the advance payment is unpaid, you'll see an Add Advance Amount button.
- Click the button to open the advance payment modal.
- Fill in the payment details:
- Mode of Payment: Select payment method (Cash, Bank Transfer, etc.)
- Amount: Pre-filled with the advance amount
- Note: Optional payment remarks (500 character limit)
- Click Save to process the payment or Cancel to abort.
Payment Confirmation
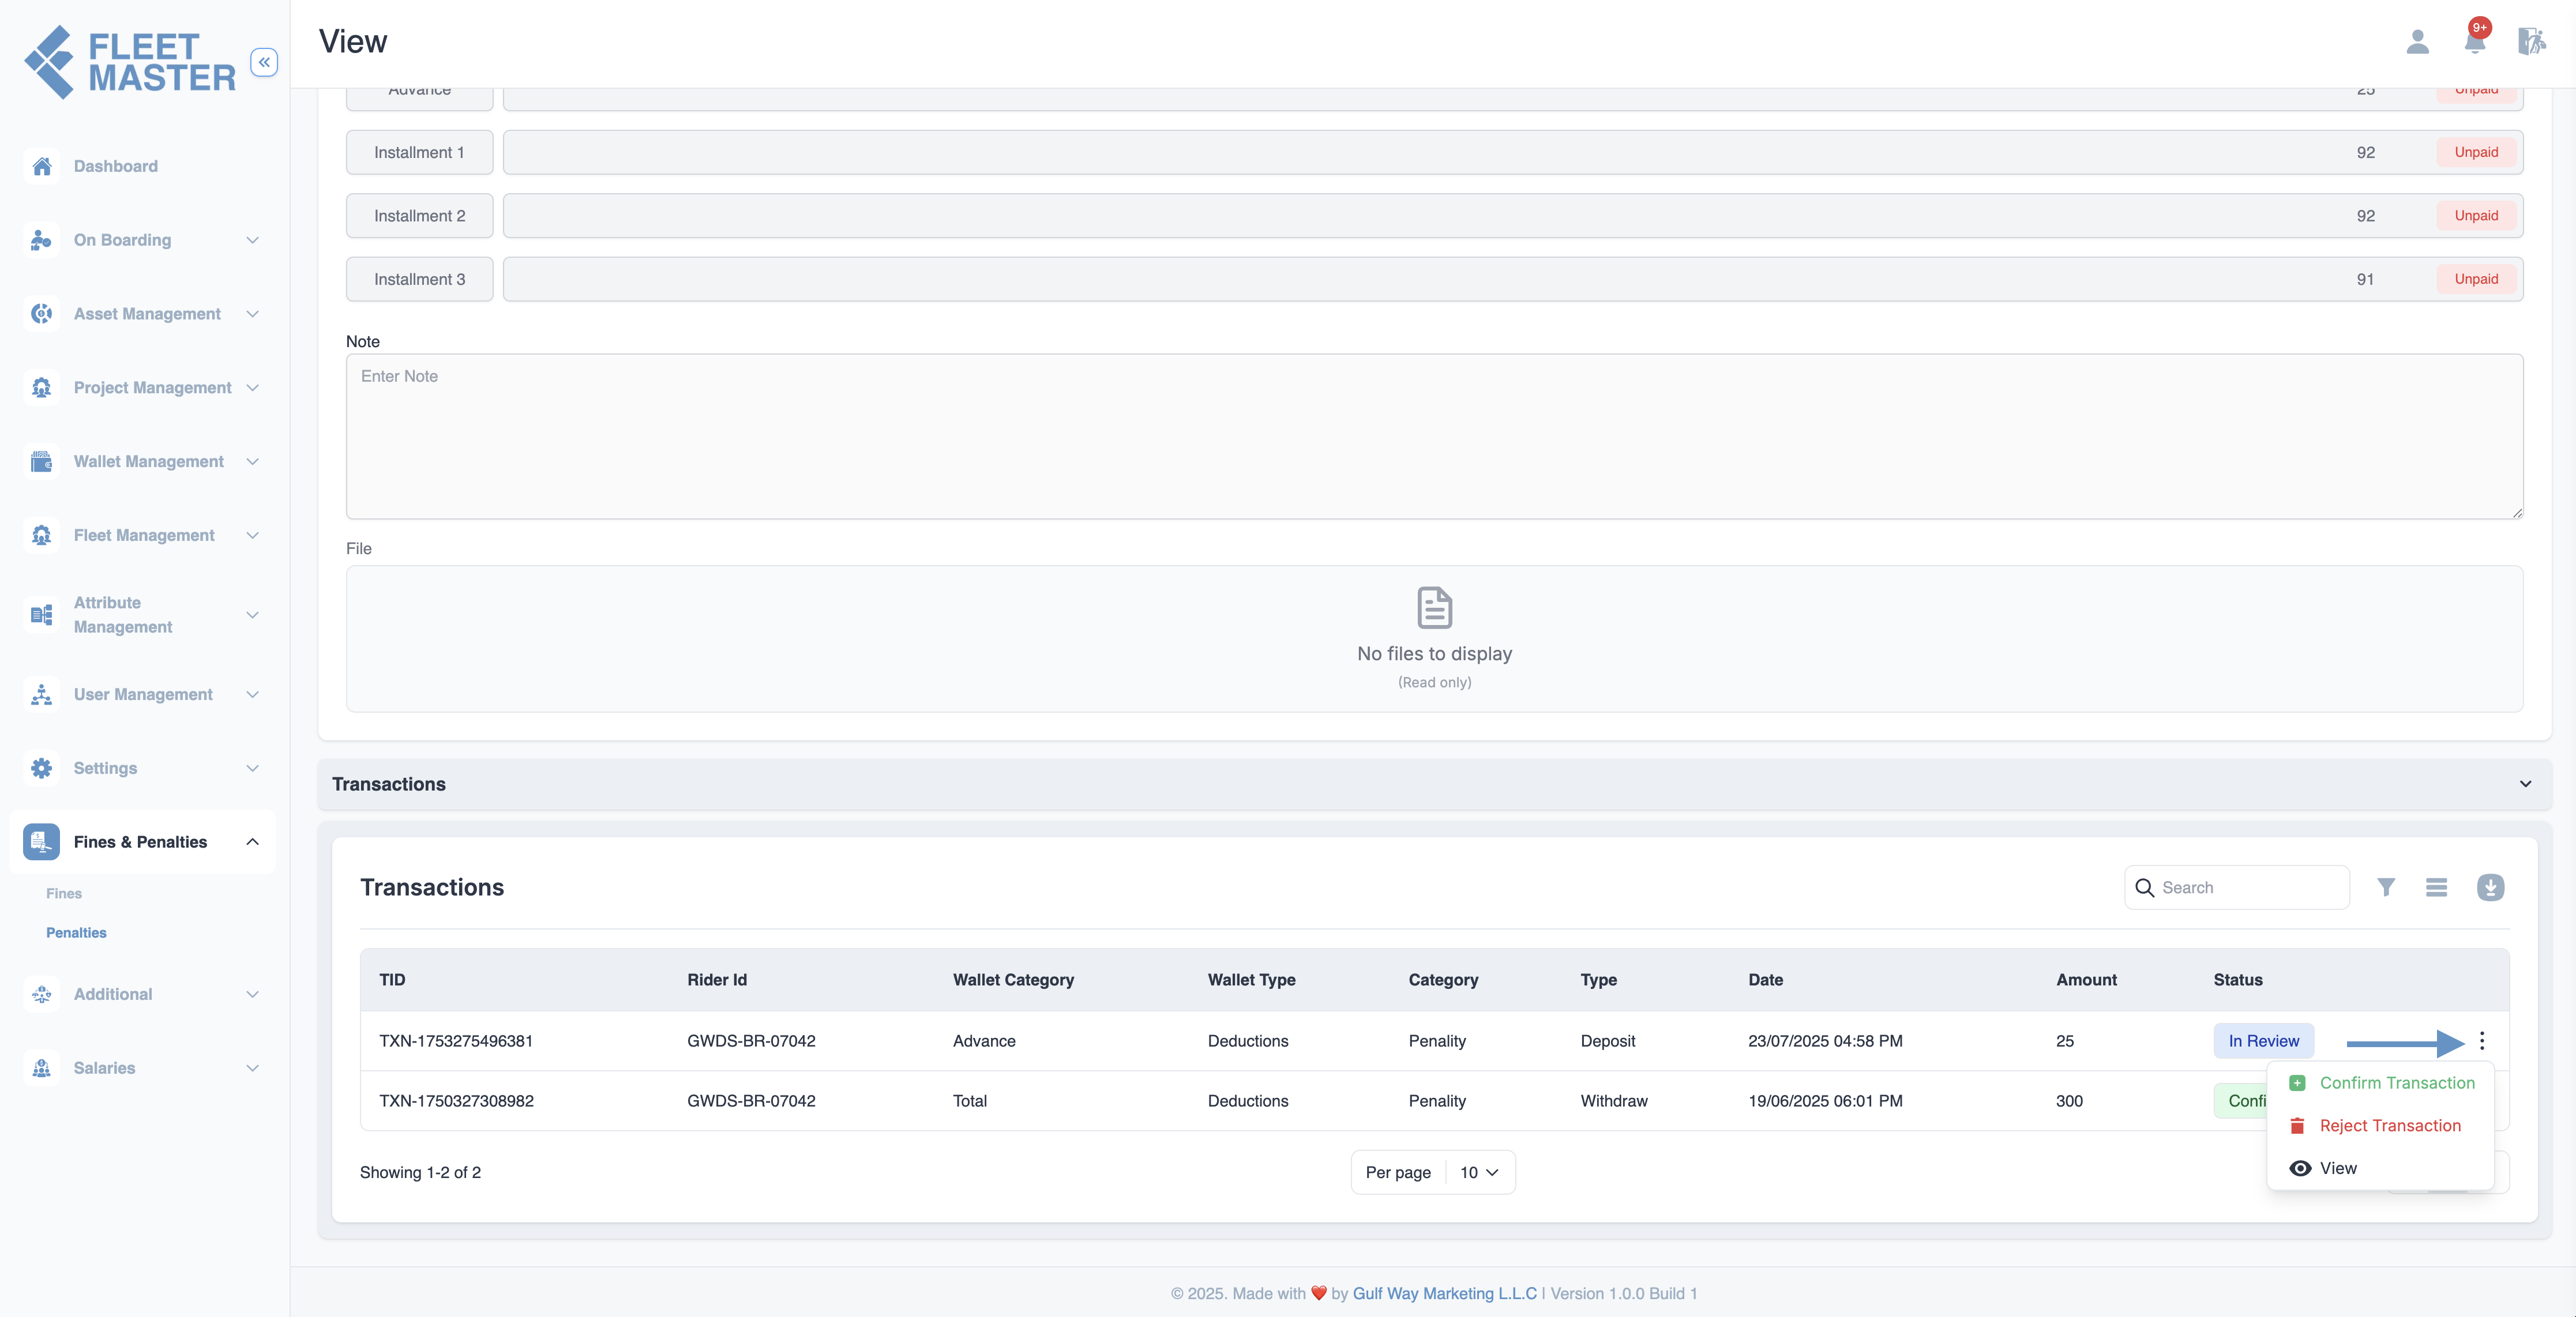
Once any penalty payment (advance or installment) is saved:
- The payment status updates to "In Review"
- A new transaction record is created in the Transactions section
- An admin must confirm the transaction before it's finalized
In the transactions interface, you can manage penalty payment confirmations through a dropdown menu with three key options:
- Confirm Transaction: Approves and finalizes the payment
- Reject Transaction: Declines the payment and reverts the status
- View: Opens detailed transaction information
Viewing Penalty Transaction Records
- Navigate to Transactions in the main menu.
- Find the penalty payment transaction with:
- TID: Transaction ID (e.g., TXN-175326126975)
- Fleet ID: Associated fleet
- Wallet Category: Advance or Installment
- Type: Deposit
- Status: In Review (pending confirmation)
- Use the action menu to:
- Confirm Transaction
- Reject Transaction
- View transaction details
Important:
All manual penalty payments (advance and installments) require confirmation in the Transactions section before being fully processed. Transactions remain "In Review" until an admin confirms or rejects them.
Key Differences: Penalties vs Fines
| Aspect | Penalties | Fines |
|---|---|---|
| Assignment | Direct to Fleet ID | Linked to Asset ID (then assigned to fleet responsible for asset) |
| Use Case | Personal violations, behavioral issues, non-vehicle infractions | Traffic violations, vehicle-related offenses |
| Provider | Not required (internal penalties) | Required (Dubai Police, RTA, etc.) |
| Ticket Number | Not applicable | Required for external fines |
| Plate Number | Not applicable | Auto-filled from selected asset |
Best Practices
- Use Penalties for fleet-specific violations that aren't tied to specific vehicles (behavioral issues, uniform violations, policy breaches, etc.)
- Use Fines for vehicle-related violations with official ticket numbers
- Always assign penalties to the correct Fleet ID to maintain accountability
- Use Installment Plans for large penalty amounts to simplify fleet repayments
- Manual payments are processed one-by-one in sequential order - fleets cannot skip ahead
- Upload supporting documents to maintain a digital audit trail
- Process advance and installment payments promptly to maintain accurate financial records
- Regularly review and confirm transactions to ensure proper payment tracking
- Monitor both salary deductions and manual payments to avoid double-charging fleets
Tip:
Penalties provide flexibility for internal disciplinary actions while maintaining the same payment and installment structure as fines. This ensures consistent financial tracking across all fleet obligations.
Security Best Practice:
Limit penalty addition, editing, and deletion permissions to HR managers, fleet supervisors, or compliance officers to maintain audit accuracy and prevent abuse. Similarly, restrict transaction confirmation rights to authorized personnel only. Ensure proper approval workflows for all manual payments and maintain clear documentation for all penalty assignments.